
I took over managing the Falmouth Allotments website and needed to migrate the website from a previous hosting solution. I initially deployed the WordPress site to a Standard B1s virtual machine. However, a recent update ended up breaking the WordPress site and initial attempts to fix failed.
What looked like a headache to troubleshoot, and resolve was an opportunity to redesign the site. When I took over managing the place, I had discussions with the allotment committee about the website needing a redesign, with initial design ideas discussed with a small group of volunteers. Fortunately, the website going down was an impetus to begin this project.

Moving away from an old WordPress website focusing on performance, cost reduction, and accessibility is an exciting project.
Overview#
The main goals I have for the new site are:
- Implement a modern, clean design.
- Reduce the quantity and size of images displayed.
- The website has been designed with accessibility in mind.
- Replace all documents with either web forms or easily browseable pages (Rules and Constitution).
- Significantly reduce hosting costs.
I will use Google Lighthouse to generate page reports to measure these goals. This enables me to identify not only performance impacts but also any accessibility issues. In addition, I want to limit the environmental impact of the website. Fortunately, this can be measured using the Website Carbon Calculator and essentially, carbon cost is limited by ensuring the new website is efficiently designed.
Azure#
For hosting the website, I'm going to be deploying to Azure. I have already moved the old site to Azure using a Standard B1s virtual machine to host the old WordPress website. I have also seen this as an opportunity to practice Terraform. Terraform is Infrastructure By Code and is a great way to manage cloud infrastructure. Primarily, Terraform helps standardise and inherently documents the infrastructure set-up. From a time perspective, it is very inefficient for a small project like this one, as I could have created everything in the portal in a fraction of the time required to get this set up.
Terraform Deployment#
The terraform deployment requires an Azure service principal to be created in Azure Entra with contribution access to the subscription. Using a GitHub Action workflow, I can manage infrastructure deployment by code.
The GitHub Action workflow is designed to automate the deployment of Terraform configurations on Azure when changes are pushed to the specified branch (in this case, the master branch). I will break down the critical components of the workflow:
name: Deploy Terraform
on: push: branches: - mastername: Specifies the name of the GitHub Actions workflow, in this case, "Deploy Terraform."
on: Defines the trigger for the workflow. In this example, the workflow is triggered on each push to the master branch.
jobs: terraform: runs-on: ubuntu-latestjobs: Describes the set of tasks to be executed as part of the workflow.
terraform: The name of the job, representing the Terraform deployment.
runs-on: Specifies the type of runner for the job. In this case, it runs on an Ubuntu environment.
steps: - name: Checkout code uses: actions/checkout@v2steps: Defines a series of steps to be executed within the job.
Checkout code: Uses the GitHub Actions built-in action to checkout the source code repository at the latest commit.
- name: Set up Terraform uses: hashicorp/setup-terraform@v1 with: terraform_version: 1.6.3Set up Terraform: Utilises the HashiCorp setup-terraform action to install and set up the specified version of Terraform.
- name: Configure Azure CLI run: | az login --service-principal -u ${{ secrets.ARM_CLIENT_ID }} -p ${{ secrets.ARM_CLIENT_SECRET }} --tenant ${{ secrets.ARM_TENANT_ID }} az account set --subscription ${{ secrets.ARM_SUBSCRIPTION_ID }}
Configure Azure CLI: Configures the Azure CLI with the necessary credentials using Azure service principal details stored as GitHub secrets.
- name: List Azure Resources run: | az resource list --output tableList Azure Resources: Uses the Azure CLI to list resources in the specified Azure subscription.
- name: Initialize and Set up Terraform Backend run: | terraform init -force-copyInitialize and Set up Terraform Backend: Initialises the Terraform configuration and sets up the Terraform backend.
- name: Apply Terraform run: terraform apply -auto-approveApply Terraform: Executes the Terraform apply command with auto-approval to deploy the infrastructure specified in the Terraform configuration.
This GitHub Actions workflow automates the process of deploying Terraform configurations on Azure, providing a streamlined and version-controlled approach to infrastructure management.
Provider and Backend Terraform#
provider "azurerm" { features {}}In this section, the Terraform provider for Microsoft Azure, "azurerm," is declared. The features {} block is left empty, indicating the default configuration.
# Back end storage of the terraform state fileterraform { backend "azurerm" { resource_group_name = "tf-state-rg" storage_account_name = "{UniqueStorageAccount}" container_name = "tfstate" key = "terraform.tfstate" sas_token = "" }}This section specifies the backend configuration for storing the Terraform state file. The state file contains information about the infrastructure managed by Terraform. The backend is set to Azure Storage ("azurerm"). The configuration includes the following parameters:
resource_group_name: The name of the Azure Resource Group where the storage account for storing the Terraform state will reside. It is set to "tf-state-rg."
storage_account_name: This should be replaced with a unique name for the Azure Storage Account where the Terraform state file will be stored. It is recommended to replace
{UniqueStorageAccount}with an actual, unique name.container_name: The name of the container within the storage account. In this case, it is set to "tfstate."
key: The name of the Terraform state file, which is set to "terraform.tfstate."
sas_token: Shared Access Signature (SAS) token, which is currently left empty. If needed, a SAS token can be provided for secure access to the storage account.
It's important to replace {UniqueStorageAccount} with a globally unique name for the storage account to avoid naming conflicts. Additionally, appropriate authentication and access controls should be configured for the storage account to ensure secure management of the Terraform state.
Creating a Resource Group#
Now I need to create a Resource Group for the Falmouth Allotment website. The following section of code creates the resource group with the name falmouth-allotment-website:
resource "azurerm_resource_group" "falmouth_allotments_website" { name = "falmouth-allotment-website" location = "west europe" tags = { environment = "production" Falmouth_Allotments = "website" }}The name attribute sets the name of the Azure Resource Group to "falmouth-allotment-website," and location determines its Azure region, here specified as "west europe."
The location is set to 'west europe' as we are limited on locations for Azure Static Web Apps. Otherwise I would deploy to UK South.
Tags, like "environment" and "Falmouth_Allotments," provide metadata for better organisation—indicating a production environment and association with the Falmouth Allotments website.
Creating a Storage Account#
One of the critical limits of the free Azure Static Web Apps is the size limitation of 0.25 GB. Considering the leading cause of data usage on the website is images, we can use a blob storage container to store images and, in this case, files needed for the website (rules, new member forms, etc.). Therefore, we are going to create a storage account and blob storage container:
resource "azurerm_storage_account" "webstorageaccount" {  name                     = "falmouthallotmentsweb"  resource_group_name      = azurerm_resource_group.falmouth_allotments_website.name  location                 = azurerm_resource_group.falmouth_allotments_website.location  account_tier             = "Standard"  account_replication_type = "GRS"  tags = {    environment = "production"    Falmouth-Allotments = "website"  }}
# Container for the website imagesresource "azurerm_storage_container" "mystoragecontainer" { name = "website-images" storage_account_name = azurerm_storage_account.webstorageaccount.name container_access_type = "container"}In the above code, I have declared an Azure Storage Account named "falmouthallotmentsweb." The account is associated with the same resource group, location, and tags as the previously created Azure Resource Group for the Falmouth Allotments website.
Additional settings declared are:
account_tier specifies the performance tier of the storage account as "Standard."
account_replication_type sets the replication type to "GRS" (Geo-Redundant Storage) for increased data durability.
Creating Static Web Apps#
To gracefully transition from a broken WordPress site, we are creating two Azure Static Web Apps, a development site and a production site. The existing DNS will be updated to point to the production Static Web App, where visitors will be greeted with a "Website Under Construction" message.
The development site enables the complete website solution to be tested before updating the pipeline to push to production.
# Development siteresource "azurerm_static_site" "under_construction" { name = "Falmouth-Allotments-Development" location = azurerm_resource_group.falmouth_allotments_website.location resource_group_name = azurerm_resource_group.falmouth_allotments_website.name tags = { environment = "production" Falmouth_Allotments = "website" }}Finally, the terraform code creates the production website. Initially, the under-construction website will be hosted here and eventually replaced with the new website.
# Production siteresource "azurerm_static_site" "production_website" { name = "Falmouth-Allotments-org" location = azurerm_resource_group.falmouth_allotments_website.location resource_group_name = azurerm_resource_group.falmouth_allotments_website.name tags = { environment = "production" Falmouth_Allotments = "website" }}Web design#
For the web design, I'm using React to meet the development project requirements. Initially, I built a single-page website as a temporary website:
The temporary website scores an A+ on carbon emissions and a perfect score on Google Lighthouse. The Lighthouse score is a lot easier to achieve on a simple one-page website. That is not to say it did not require work to achieve. I thought my initial colour schemes for buttons to download the forms were accessible, only to find the colours were too close that there was the potential that some people may struggle to differentiate text from the background. Fortunately, an error was avoided thanks to the accessibility report.
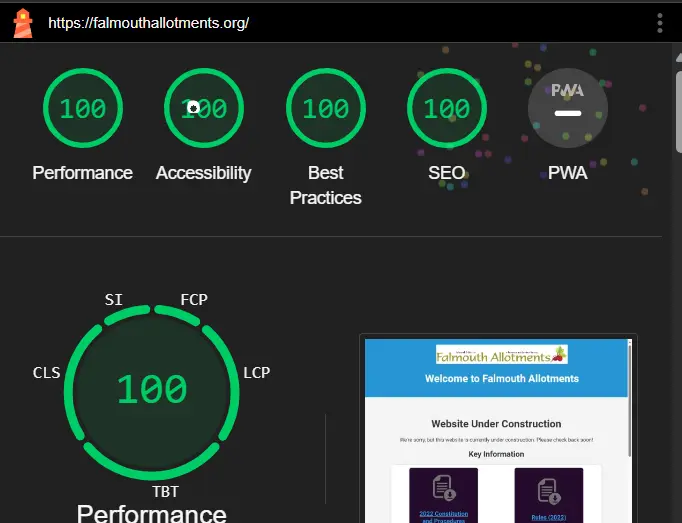
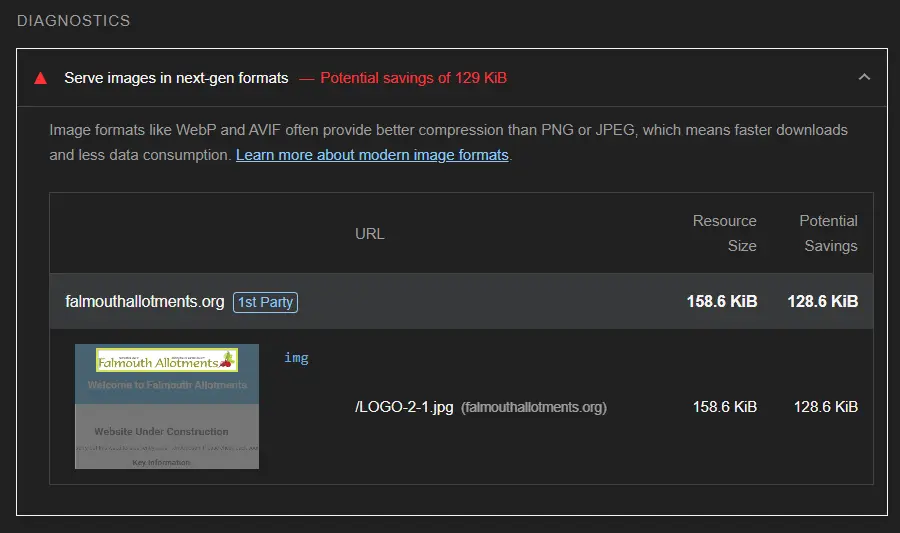
Even with a 100% score, there is still helpful advice to improve performance. For example, it has advised updating the JPEG and PNG files to a more next-gen web image format. For this, I have used WEBP image files to reduce the performance impact by loading images. Google has developed the WEBP Image format, smaller than JPEG or PNG file formats. The page went from a load time of 0.5 seconds to 0.3 seconds by replacing the PNG and JPEG file formats with WEBP format.
The temporary website does not reflect the new design of the replacement website. It was valuable in testing the available accessibility tools and the deployment process.
React setup#
Setting up a React project is very easy. There is an extensive range of React Templates to choose from. However, in this case, I went with a React Basic Template, as I needed to build a single-page website. I created a new repository using the template with all the necessary folder structures and files. The only additional file required was the main.yml file for the GitHub Action pipeline for deployment.
GitHub Action setup#
To deploy the website files to the Azure Static Web App we use GitHub Actions. The pipeline builds the website when a new commit is pushed to the main branch.
name: Build and Deploy
on: push: branches: - mainname: Specifies the name of the GitHub Actions workflow. In this case, it's named "Build and Deploy."
on: Defines the trigger for the workflow. This workflow is triggered on each push to the "main" branch.
jobs: build_and_deploy: runs-on: ubuntu-latestjobs: Describes a set of tasks to be executed as part of the workflow.
build_and_deploy: Specifies the name of the job, which is "build_and_deploy" in this case.
runs-on: Specifies the type of runner for the job. In this example, it runs on an Ubuntu environment.
steps: - name: Checkout repository uses: actions/checkout@v2steps: Defines a series of steps to be executed within the job.
name: Describes the purpose of the step, in this case, checking out the repository.
uses: Specifies the GitHub Actions built-in action to be used. In this case, it's actions/checkout@v2, which checks out the source code repository at the latest commit.
- name: Set up Node.js uses: actions/setup-node@v3 with: node-version: 14This step sets up Node.js for the workflow.
name: Describes the purpose of the step, which is to set up Node.js.
uses: Specifies the GitHub Actions built-in action to set up Node.js. In this case, it's actions/setup-node@v3.
with: Provides configuration options for the Node.js setup, such as the version to be used (Node.js version 14).
- name: Install Node.js dependencies run: npm installThis step installs Node.js dependencies using npm.
name: Describes the purpose of the step, which is to install Node.js dependencies.
run: Specifies the command to be run in the shell, which is npm install.
- name: Build React app run: npm run buildThis step builds the React app.
name: Describes the purpose of the step, which is to build the React app.
run: Specifies the command to be run in the shell, which is npm run build.
- name: Deploy to Azure Static Web Apps uses: azure/static-web-apps-deploy@v1 with: azure_static_web_apps_api_token: ${{ secrets.AZURE_STATIC_WEB_APPS_API_TOKEN }} repo_token: ${{ secrets.GITHUB_TOKEN }} action: 'upload' app_location: 'build' output_location: '' This step deploys the application to Azure Static Web Apps.
name: Describes the purpose of the step, which is to deploy to Azure Static Web Apps.
uses: Specifies the GitHub Actions custom action to deploy to Azure Static Web Apps. In this case, it's azure/static-web-apps-deploy@v1.
with: Provides configuration options for the deployment.
azure_static_web_apps_api_token: Specifies the Azure Static Web Apps API token, which is stored as a GitHub secret.
repo_token: Specifies the GitHub token for repository access, which is also stored as a GitHub secret.
action: Specifies the deployment action. In this case, it's set to 'upload' to upload the application.
app_location: Specifies the location of the application files. In this case, it's set to 'build'.
output_location: Specifies the location of the output files. It's an empty string in this case.
This GitHub Actions workflow automates the process of building a React app, and deploying it to Azure Static Web Apps whenever changes are pushed to the main branch.
Custom Domain#
Azure Static Web Apps provides a domain at set up, in this case brave-ocean-04472ae03.4.azurestaticapps.net. Initially, helpful for testing your new app, but if this is a project you want to share, then you will look at setting up a custom domain. Fortunately, this is a straightforward process. You must verify domain ownership with Azure and then update records to point at the Azure Static Web App.
Navigate to the Azure portal and access the Azure Static Web Apps resource. Add your desired domain name within the "Custom domains" section, ensuring it aligns with your organisation or project. Subsequently, update your domain registrar's DNS settings to point to the Azure-provided DNS values. This facilitates connecting your custom domain and the deployed Azure Static Web App. Once the DNS configuration propagates, your static website will be accessible through the custom domain.
Conclusion#
Azure Static Web Apps are a fantastic tool for web development projects. The replacement for the Falmouth Allotment website is an enjoyable development project. Coupled with the use of GitHub Actions, the deployment pipeline has been an easy and effective method of quickly deploying the website. During the write-up of this blog post, I was able to identify an accessibility issue and also update the images to use WEBP format. Each time, a change was made and pushed to the repo for the automatic deployment to complete in a few minutes. This made updating the deployed website simple.
Going through the process for the temporary site meant I had everything set up for the actual replacement site. It has also given me an excellent opportunity to test the tools to evaluate the location on a simple site and consider accessibility at the initial development stage rather than trying to resolve issues after the fact. I'm looking forward to deploying the completed replacement site soon.